Sunday, December 2, 2012

Techniques for formative assessment

Here are a couple more tools you can use for formative assessment (activities that provide you with information about how to design future learning activities).

Analogy Prompt
Occasionally, when you are eliciting information from students about how well they understand the material you are teaching, get them to complete this sentence: "(a designated concept, principle, or process) is like ___ because ___."

3-minute Pause
The 3-minute Pause gives students an opportunity to stop and reflect on new knowledge recently acquired. Get them to complete the following statements:
  • I changed my attitude about ... because ...
  • I became more aware of ...
  • I was surprised by ...
  • I felt ...
  • I empathized with ...

Ticket to Leave
This is a closing activity where students respond in writing or verbally to short assignments before they leave the room.

Formative assessment: index card summaries

Distribute index cards in class if your are teaching face-to-face, or set up a bulletin board discussion if you are teaching online.

Instructions to students:
Side 1 / Question 1: Based on our study of (topic), summarise one of the main ideas you have encountered as a single sentence statement.
Side 2 / Question 2:  In one sentence, identify something about (topic) that you do not yet fully understand.

Collect and read the material and use it to provide students with extra learning resources, or to guide their future learning.

Web-based tools for teaching

There are a range of tools available that facilitate collaborative and group work on the web. Perhaps surprisingly, they are often free. Here are some I have come across recently. These can be used in online classes, but are equally useful in supporting face-to-face teaching.
Titan Pad
This a tool that provides for multiple writers and editors on the same document. Updates happen in real time, there is an infinite undo button, and each contributor gets his or her own colour.
Crocodoc
Crocodoc isn’t free, but you can sign up for an evaluation account. Crocodoc is a tool designed to convert Microsoft Office and PDF documents to HTML5. These documents can be embedded in any web or mobile application using iFrame or Javascript. The application has a range of commenting and mark-up tools, so that multiple authors can comment, highlight, and drawing on the document in creation.
iResponse
iResponse is two iPhone/iPad apps – one for the teacher and one for the students. It allows students to use their mobile devices as classroom clickers, responding to multiple-choice, true-false, yes-no, and survey questions. The teacher can view the class results on a Mac. It’s a pretty nifty Mac application that means that institutions can get students to use their phones and tablets to replace the hand-held classroom response devices that have been around for several years.
VotApedia
VotApedia is an audience response system that makes use of mobile phones. You can set up surveys, questionnaires, quizzes, anonymous texting, identified texting, and ranking, e.g. of conference presentations. It's a great tool: free, and invented up the road from me by the CSIRO.
Lino It
Lino It is a “free sticky and canvas service that requires nothing but a web browser”. Those who have access can post a sticky note to their canvas from anywhere at any time. The canvas can be shared by several people.
Wallwisher
Wallwisher is similar to Lino It. It’s a free shared web-based notice board that allows you to make noticeboards, teach, bookmark sites, discuss things, moderate discussions, brainstorm, send messages, plan events, keep notes, make lists, watch and share videos, and collect feedback.
Webspiration
This one isn’t free, but you get a 30-day trial of the application, which is a tool to help students to write. It looks pretty good.
Quizlet
A tool to make online quizzes.
Quia
Another tool for making online quizzes.
Voicethread
This certainly isn’t free, but it looks like a great tool. Here’s what they say they do:
“With VoiceThread, group conversations are collected and shared in one place from anywhere in the world. All with no software to install.
“A VoiceThread is a collaborative, multimedia slide show that holds images, documents, and videos and allows people to navigate slides and leave comments in 5 ways - using voice (with a mic or telephone), text, audio file, or video (via a webcam). Share a VoiceThread with friends, students, and colleagues for them to record comments too.
“Users can doodle while commenting, use multiple identities, and pick which comments are shown through moderation. VoiceThreads can even be embedded to show and receive comments on other websites and exported to MP3 players or DVDs to play as archival movies.”
 If you are using something along these lines, post a comment and a link.

Monday, May 14, 2012

Formative assessment in action


University teachers tend not to be explicit about the formative assessment techniques they use. In fact, there are many who don't use the term at all when describing their practice.
Formative assessment is any learning activity that will assist the teacher to identify deficiencies in student learning to date, design future learning tasks to address these deficiencies, and provide students with feedback that will assist them to improve their performance in summative assessment activities. Formative assessment may be marked, but that mark will not count towards a final grade. It's one of the most useful strategies employed by effective teachers in any part of the sector. It helps teachers to monitor their own effectiveness, and to monitor the progress of their students.
So, if you've ever reached the end of a teaching session - a lecture, a tutorial, a seminar, a class, or some other form of lesson - and wondered whether your students have actually grasped the points you intended them to learn, you need to introduce some formative assessment. Here are a few techniques that will give you feedback on your teaching and on how well students have learnt the lesson you were teaching. You might discover that some quite unexpected things are happening in your class - both inspirational and horrifying. It's always best to know.
  1. The Minute Paper: Towards the end of the session, ask students to spend five minutes answering two questions:
    • What was the most important thing you learnt during this class?
    • What important question remains unanswered?
  2. The Muddiest Point: Towards the end of the session, or at the end of a section, ask students to spend five minutes answering the question "What was the muddiest point in ___ ?".
  3. RSQC2: Students write brief statements that recall, summarize, question, connect, and comment on key points from a session.
  4. Pro & Con Grid: Students list the pros/cons, costs/benefits, or advantages/disadvantages of an issue or question in a two-column format.
Collect the papers on occasion, and respond to them at the beginning of your next session with the students, in whatever way seems appropriate. At other times, simply invite students to make brief comments themselves at the beginning of the next class before moving on.

Variations on these techniques can be found in a range of different texts.

Directed Paraphrasing

This is a technique I encountered in an old booklet called Class Assessment Techniques: a handbook for faculty, by K. Patricia Cross and Tom Angelo, and have adapted slightly for this posting.

The activity is designed to test "the degree to which students have understood and internalized a given lecture or reading by [evaluating] their ability to summarize and restate the lesson in their own words". That sounds a bit bland, but think further on this later comment by the authors: "much of a student's eventual success depends on his or her ability to first internalize rather specialized and often complex information and then effectively communicate it". Are you the kind of person who understands something better once you have taught it to someone else? Me too.

This is a very authentic learning activity which mirrors the kinds of skills that students will need once they enter the workplace.

So here's what you do.
  1. Select a point in your course - perhaps after a major reading assignment, lecture, or seminar.
  2. Decide on an appropriate audience for the students, and how much speaking time they will need. Choose a non-expert audience. For example, if they are psychology students, they might be asked to describe a counselling technique to a group of teachers; if they are accountants, they might be asked to describe a change in the tax law to a client; and if they are medical students, they might be asked to describe a surgical technique to the parents of a child about to undergo an operation.
  3. Provide the audience with feedback sheets. Each feedback sheet should include the following:
    • an overall rating presented as a set of boxes to tick:
      • confusing
      • mininally understandable
      • adequately outlined
      • excellent explanation
    • space for members of the audience to record comments about the best aspects of the presentation
    • space for members of the audience to record comments about the worst aspects of the presentation
  4. If you have time, for each presentation, put the speaker in a group with his or her audience, and give them time to talk about the best and worst aspects of the presentation. You might need to provide guidance on the best way to provide useful feedback without destroying confidence. Alternatively, you as teacher can collect these evaluation sheets, go through and summarize them, add your own comments, and return them to the speaker.
Make sure that students do present the material in the role they have been allocated (and that they don't merely read out a pre-prepared script from a cheatsheet or a PowerPoint slide). Encourage them to use metaphor and examples, to draw on the board or on a piece of paper, and to check understanding with their audience to ensure that the main points are getting across.

Further reading:

Cross, K. Patricia & Angelo, Thomas A. (1988). Classroom Assessment Techniques: a handbook for faculty. Michigan: National Center for Research to Improve Postsecondary Teaching and Learning.

I found a copy on the web at http://eric.ed.gov/PDFS/ED317097.pdf, courtesy of my University's libary database subscriptions, but more recent and much more beautiful editions can be purchased from all the usual places.

Tuesday, April 3, 2012

The Mini-conference

In a traditional face-to-face teaching environment where students are assessed partly on an oral presentation, the lecturer usually puts up a list of the available spots and students (or groups of students) sign up for a spot.  Some go for the earliest spots, so that they can get it over and done with early. Others sign up for later spots, so that they can see what others do before them. Either way, marks have to be tweaked to take the schedule into account.

Here’s an alternative, suggested to me by my colleague James Meek: the mini-conference.

Instead of holding oral presentations every week for the 13 weeks of the semester, bring the students together towards the end of the semester for a whole day (or two), and run the day like a mini academic conference, complete with plenaries, discussion panels, streamed presentations, and opportunities for informal networking.

This works equally well for traditional semester-long courses, intensively-delivered courses, online courses (except here you run it like an online conference, e.g. Follow the Sun: Online Learning Futures Festival), and short courses.

Thursday, March 29, 2012

Crosswords

In some disciplines, the vocabulary (and spelling of specialist language) is extremely important. If this is so for your discipline, you might think about developing a number of crossword puzzles to use as stimulus or starter activities at the beginning of class, to fill in those minutes when the latecomers are drifting in. This will give your students practice at spelling the language of the discipline (and becoming familiar with the meanings of the words).

There are a number of websites that offer free software and more that offer more sophisticated, paid applications. Here’s a crossword I generated using one of these free online puzzle makers, and the answer sheet.


Small Groups

Small group discussions can work very well, but you need to have quick, easy ways of grouping and re-grouping the students.

Here are some methods.

First, count the number of students in the class on the day.

Decide how many people you want in each group. Say you have 20 students in the group, and you want them in groups of five.

  1. DIY: “Divide yourself up into groups of five.” If you do it this way, they will sit with their friends. This works in some situations, but not in others.
  2. Count them off: Once all the students are in the room, count them off around the room: 1, 2, 3, 4; 1, 2, 3, 4, … etc. Sit all those numbered 1 together, all those numbered 2 together and so forth.
  3. Aye, Captain: Pick four “captains” and allow them to choose four others to join their group.
  4. Mixed abilities: Create lists of team members before you get into the room, based on ability. In each group, put one from the highest-achieving five, one from the lowest-achieving five, and three from the middle of the pack.
  5. Similar abilities: Rank the students, and then make up the groups by allocating them in order: the five top-achievers are in Group A, the next five in Group B and so on.
These are their Home Groups.

Beadle’s Jigsaw
So, you’ve grouped the students and set each group a different (but related) set of on-topic questions. Keep the list of questions short. They discuss the topic and questions in their Home Group.

While they are talking, go around, and put stickers on their upper arms. (You will have pre-prepared stickers that will sort the students into four Expert Groups, each of five students.) Stop the first discussion.
Direct the students to stand and re-group according to the stickers: all those in Expert Group 1 sit together, and so on.

In the Expert Group discussions, each student reports on discussions and conclusions from his or her Home Group.

If necessary, move them back into their Home Groups and begin all over again with a different topic.


To read more about Phil Beadle’s tips on teaching, read his book: Beadle, P. (2010). How to teach. UK & USA: Crown House Publishing.

Thinking Aloud as a Problem is Solved

This idea is from a site that focuses on collaborative learning.

The strategy is this.

Divide the class into pairs. If you have one student left over, add that student to one of the pairs as an extra listener, or listen to him/her yourself.

Present the pairs with the problems they are to solve. The first person in the pair takes the role of Solver for the first problem. He/she reads the problem aloud, and talks through the solution, making notes when necessary. The second person in the pair is the Listener. He/she listens carefully, but does not guide the first person to the solution. Rather, the Listener's role is to catch any errors (pointing out that an error has been made, but not identifying it or providing correction), question the Solver about any gaps or leaps in logic, and ask for clarification when the Solver's explanation becomes unclear.

To read the author's explanation of the theory behind the strategy, go to the Doing CL website.

Wednesday, March 28, 2012

Building Student Communities

Most tertiary sector institutions use a Learning Management System (LMS) these days. It might have a local name, but sitting behind that cutely named online learning environment is usually one of the vendor-supported applications (e.g. Desire2Learn) or one of the two main English language open-source LMS applications (Moodle or Sakai). This isn’t about LMS applications, though, it’s about a couple of lovely little (externally-hosted) tools called ELGG and Ning.

ELGG: According to the company website, ELGG “is an award-winning open source social networking engine that provides a robust framework on which to build all kinds of social environments”. It’s a bit like an LMS, but not really. It’s reason for being is to facilitate social learning and sharing of resources and ideas.

Ning: The Ning website says: “Hit the ground running to engage and grow your community (big or small). Organize events. Use member profiles to bring faces to names. Get everyone talking through groups, forums, chats and activity stream. Plus more (lots more).

Have a look … I am sure you will find uses for them. Free versions are available.


K-W-L

The K-W-L technique is a very useful little tool to have in the kitbag, and could be used for a range of purposes.

In essence, it is a tool for reflection. Students are asked to reflect on three things:

In the beginning:
  1. What do they Know?
  2. What do they Wish to know?
Throughout the course and at the end:
  1. What have they Learnt?
So, how could it be used?  Here are three examples that spring to mind.

Diagnostic assessment

On the first day of class, with a new cohort from diverse backgrounds, the teacher using the technique for diagnostic purposes would ask students to answer the first two questions. This information would be used to shape teaching and learning activities and decisions about whether or not to provide “catch-up” material for those students who aren’t fully prepared for the class, and to assist students to make decisions about how best to expend their energies and time on their own learning activities. At the end of the course, they would be asked to reflect on the success of the experience in improving their learning.

Building a Community of Learners

The technique could be woven into the pattern of the class. At the beginning of each new topic or module, students would complete the first two questions in groups and share their responses. They could then pair up, based on the pre-existing knowledge each participant is bringing to the course. At the end of each module, each group or small community of learners would compete the third reflective question and report back to the whole class. In this way, the technique would help students to begin to identify their most effective learning strategies.

Learning blogs

Where students are keeping learning journals or learning blogs, they could be directed to use this technique in their first entry, completing the first two questions at the beginning of the course, and adding material throughout the course to answer the third question, finishing with a final blog / journal entry that revisits their first entry and summarizes their learning throughout the course.

Create your Own Comic Strip

It's tempting to use other people's comic strips, but generally not a good idea without seeking permission. (That #@*** copyright legislation ... it just gets in the way ...)

However, with the Stripgenerator tool, you can create your own.

Here's one I made earlier:


To create your own, go to Stripgenerator.

Fake Your Own Newspaper Clipping

There are a range of little tools on the internet that allow you to personalize and create images and animations that you can use to stimulate student engagement. One of my favourites is freely available from fodey.com. It allows you to create very realistic looking newspaper clippings.

Here’s one I made earlier.


Fake clippings like this can be used to start conversations, decorate slides, or just for fun.

Developing Skilled Readers


Roland Paris of the University of Ottawa, realizing that it would be up to him to teach his students how to read critically, uses the CLEAR (or possibly the CLEAA) technique. This is a strategy that helps students to:
  1. Identify the claims or arguments of a text,
  2. Evaluate the logic of these arguments,
  3. Assess whether the author has presented sufficient and valid evidence to support the arguments, and
  4. Consider alternative evidence and arguments that challenge the original line of reasoning.
He teaches students to look at each piece of academic writing from the following perspectives:
  • Claims: What are the main claims and arguments outlined in the text?  What is the author’s main point?
  • Logic: How does the author reach these conclusions?  What are the steps in the author’s reasoning or logic?  Is this logic sound?
  • Evidence: What evidence does the author present to support the argument(s)?  Does he/she offer enough evidence?  Is this evidence convincing?  Can you think of any counter-evidence that would challenge the author’s claims?
  • Assumptions: Does the author rely on hidden assumptions?  If so, are these assumptions correct? How do you know?
  • Alternative aRguments (well, yes – it doesn’t start with an R, but there’s one in there somewhere): Can you think of alternative arguments that the author has not considered?
For more information:
Visit Roland Paris’s website to read more.
  

Group Discussions with the 5 Cs

It can be difficult to keep group discussions fresh.  Here are my guidelines.

1. Be very clear about process, and very unclear about outcome – and keep it simple. By this, I mean:
  • Give each group only one question per discussion round. Provide the question in writing.
  • Make roles in the groups explicit before you start.
  • Tell your groups how long you expect them to spend on discussion before they report back.
  • If you expect groups to keep a written record of the discussion, tell them so.
  • Provide large sheets of butcher’s paper and markers so that the discussion can be recorded.
2. Allocate roles to the group members before you start. (As the participants become more experienced, they will be able to allocate the roles themselves.) Hand out role cards. The Catalysts and Curmudgeons exchange their role cards after their turns in those roles are complete. I use the following roles and print the instructions about the role on the role card:
  • Chair (1 only per group): The Chair’s role is to keep the group on task, using ‘active listening’ techniques. For example, “So you think that [repeating the words he/she has just heard]”. If the discussion involves more than one round, the Chair stays at the same table for all discussion rounds.
  • Commentator (1 only per group): The Commentator’s role is to document the discussion and report back on key points. If the discussion involves more than one round, the Commentator stays at the same table for all discussion rounds, with the same Chair.
  • Catalyst (1 only per group): The Catalyst stimulates discussion and debates in a provocative and positive manner. Any one person is only allowed to hold the role of Catalyst once a day. If the discussion involves more than one round, the Catalyst moves to a new group for second and subsequent rounds, and exchanges roles with a Conversationalist.
  • Curmudgeon (1 only per group): The Curmudgeon is in the group to provide a sceptical perspective and to play Devil’s Advocate. Any one person is only allowed to hold the role of Curmudgeon once a day. If the discussion involves more than one round, the Curmudgeon moves to a new group for second and subsequent rounds, and exchanges roles with a Conversationalist.
  • Conversationalist/s (up to 3 per group): The Conversationalists carry the discussion, although those holding other roles are also part of the conversation. Conversationalists are allowed to hold the role more than once a day. If the discussion involves more than one round, the Conversationalists move to a new group for each round. Some Conversationalists will take on the role of either Catalyst or Curmudgeon if there is more than one round.
3. Keep reporting back simple. Do have a reporting back session after each discussion round. Never let any group report exhaustively on every detail of their discussion round. You can use a couple of techniques for this.
  • Ask the first group to report on the one most interesting thing that came up in their discussion round. Move on to the next group, and ask them to report on the one most interesting thing that came up in their discussion round. If the first group has already reported on that issue, they must choose something else to report. Each group gets to report one new thing until they have nothing new left to report.
  • Follow the same guidelines, but stop after each group has reported one interesting thing.

Learning Designs

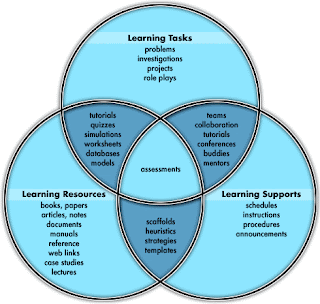
The concept of learning designs deals with the way a teacher constructs a sequence of student learning experiences, activities, and interactions to facilitate the acquisition of knowledge. The design is the framework.

This idea is particularly useful for the teacher who is beginning to move away from a totally face-to-face learning environment to one that blends face-to-face teaching with online learning, or to a one that is entirely online – but it is a useful planning tool for teachers designing curriculum to be delivered in any mode, including face-to-face. For example, the framework would be equally useful to someone trying to decide which of the many tools available in a Learning Management System are most appropriate for a certain learning task as it would for someone looking for new ways of engaging students in a typical face-to-face tutorial environment.

Authors of the technique use the following terms:
  • tasks: activities that students are required to complete
  • resources: artefacts used by students to complete the tasks
  • supports: mechanisms, including technologies, processes, and roles
Figure 1 (Oliver, 1999), gives an overview of the way a designer using this theory thinks about the three aspects of curriculum design.
Figure 1: The interaction between tasks, resources, and supports in learning design (Oliver, 1999)


To give you a clearer idea of the tool, here is an example of a documented learning design.
Figure 2: Example learning design and learning outcomes


For more information:
The Learning Designs website provides much more information.
You can read about the technique in Oliver, R. (1999). Exploring strategies for online teaching and learning. Distance Education, 20(2), 240-254.


Questioning

Too often, teachers rely heavily on the kinds of questions known as display questions.  I call them “guess-what’s-in-my-head” questions. Technically, these are questions designed to elicit learners’ prior knowledge and to check comprehension. They focus on declarative knowledge, and they look like this:
  • What does … mean?
  • When do we use …?
  • What comes after …?
  • … is [said with a rising intonation and followed by a long pause]? (This one is particularly irritating.)
  • What’s the opposite of …?
Equally irritating and equally useless – at least for purposes of engaging learners – are convergent or closed questions. Correct answers to these kinds of questions are narrowly defined and require little reflection or originality. They usually simply require students to remember stuff. They look like this:
  • What do we call …?
  • When did … do …?
  • Where did … happen?
Of course, convergent and closed questions do serve a useful purpose. For example, they can be used to check that students have understood your instructions (“Are you working alone or in pairs? Have you finished? Are you going to write something now?”), to manage the class (“Are you discussing the topic? Can you see the board? Why are you sitting on your own?”), or to check on progress (“Are you ready to move on to the next topic? Do you have any questions?”).

The thing to remember about them, though, as that they are information-gathering; they provide the teacher with information about what the students know (or don’t know). They aren’t very interesting for the students.

The best questions for learning – and you have to teach students to be ready for them – are divergent or open-ended questions. These questions are broad and challenging and they often generate multiple answers. They require a level of thinking that is more demanding. They encourage students to offer opinions, to elaborate, to explain their conclusions, their reasoning, and their evidence, and to engage in discussion.

Teachers who use these types of questions are engaging in conversations with students designed to stimulate learning rather than interrogating them about what they don’t know.

These questions look like this:
  • What is the nature of [a concept … justice, truth, beauty]?
  • How do we know what we know?
  • How did you come to [a particular] conclusion?
  • Why is it so?
  • What else led you to this conclusion?
Consider the following series of questions:
  1. Was Napoleon defeated at Waterloo?
  2. Who defeated Napoleon at Waterloo?
  3. How was Napoleon defeated at Waterloo?
  4. Why was Napoleon at Waterloo? How do you know?
  5. What would have happened if Napoleon hadn’t lost the Battle of Waterloo? Why?
We can be sure that students who can answer the last two question sets, outlining their evidence and explaining how they came to their conclusions, are going to do a lot better on any test about the Battle of Waterloo than students who can answer only the first three questions.

Once your students have become comfortable with divergent questions, you can introduce a structured questioning activity in each class or lecture.

Try the Pose, Pause, Pounce, Bounce technique. It goes like this.

Explain the technique to the class.

Pose: Pose the question/s, reminding students that you don’t want them to answer immediately.

Pause: Tell the students to hold the thought, to think, and to think again. Be clear: no one is to speak until invited. (At this stage, you may wish to introduce small group / pair discussions, or give students opportunity to write about the topic. Once they have an answer, have them sit and wait, reflecting on their answer, until you are ready to select someone to provide an answer.)

Pounce: Identify the student who is to answer; name the student (A). Wait for A’s answer. Don’t give the students any idea about your opinion of the answer.

Bounce: Once you have student A’s answer, bounce to student B and ask B to give his or her opinion of A’s answer. Bounce to student C: what does he or she think of B’s comment? Use reflective listening techniques: “A has told us that …; B thinks that …; C has thrown in the idea that …”.

Finally, sum up the conversation and clear up any remaining misconceptions.

Mazur's Peer Instruction

A Harvard lecturer in physics, Eric Mazur, discovered that his students were not as knowledgeable about physics as he had hoped, even when they scored well on in-class tests.  He developed a classroom technique that uses “clickers” – handheld classroom response devices – to ensure deep, persistent learning. This technique requires students to first commit to an answer, and then to convince their fellow students that their answer is correct.  This simple technique has improved results for Mazur’s students, something he proves with quantitative data collected over 20 years. The technique is easily adapted for most disciplines. The process is outlined in the following flow-chart.


You will need some equipment to make this technique work. If you don’t have access to classroom clickers, prepare pieces of coloured card. Then, when you ask your question, students respond either by clicking the handheld device (which will throw up a neat histograph on the projected screen), or by holding up the relevant coloured card (e.g. red for A, green for B, purple for C or red for YES, blue for NO), which will allow you to scan the room and make a decision about which step you will take next.

For more information:

Presentation Tools

These are the tools that we all use to present seminar and conference papers or to gather and present the ideas of a group.

Slideshow tools

PowerPoint: You will be familiar, I am sure, with PowerPoint – the tool found on almost all corporate computers and one of the most widely used presentation tools in the world. PowerPoint is packed with features and supports a wide range of file embedding and compression options. It’s an oldie, but a goodie.

Keynote: Keynote is the Apple alternative to PowerPoint, and works in much the same way. It works better than PowerPoint with Apple’s mobile devices, but that’s to be expected.

Beamer: For LaTeX users – engineers, scientists, and programmers – Beamer could be a useful alternative to PowerPoint and Keynote. For those of us more used to WYSIWIG editors, Beamer looks like a nightmare.

Canvas tools

Prezi: Prezi hasn’t been around for long, but has already gathered a strong following. With Prezi, the author dots various bits of information around a canvas, and then builds links and transition effects, creating a presentation that doesn’t have to be as linear as the slide show presentations. It allows the presenter to zoom in and out, depending on whether she is talking about the overall picture, or a detail within the picture.

Popplet: Popplet is a digital pinboard, onto which the author “pins” “popples” – containers for digital material. It provides a very nice interface that provides for collaboration and allows users to collect, bookmark and organize ideas, information, websites, and various bits of media.

Wallwisher: Wallwisher is an online noticeboard. Users post their ideas on digital sticky notes.

Mindmapping tools

Mindmapping or concept mapping tools can be used for presentations too. The author creates a mindmap, using one of the many tools about, collapses it, and opens each node as he or she begins to speak, thereby building up the map. Try one of the following tools – MindMeister, MindJet MindManager, XMind, FreeMind, iMindMap, ConceptDraw MindWave or Spinscape.


Opinion Pictures

Class voting techniques can be used for a variety of purposes. What do the majority of students think about something? How many students have the correct answer? What would the majority of people do in a certain situation? What comment do students have to offer on the topic under discussion?

The two applications mentioned here allow you to present the results of these activities in visual form.
Answer Garden is a very simple interactive tool. To use it, your students will need access to the web, and information about where to find the relevant question (the URL of the AnswerGarden you have created for this particular lesson).

When you use the tool, you create a question to which students post their answers. If more than one student posts the same answer, it will appear in larger text than other answers.

  1. go to the website
  2. click on the link that allows you to create a new AnswerGarden
  3. type in your question
  4. finesse the settings and set up your administrator password (so that you can edit the image later)
  5. click on the “create” button
  6. distribute the URL to the appropriate people (try http://answergarden.ch/view/26384 to see how that works)
  7. monitor the results
This is what your students see when they go to the Answer Garden you have created. Here’s a picture of one I made earlier.


Wordle is a similar tool, but it works differently.
To make a word picture using Wordle, you:
  1. Collect student comments in a single Word file
  2. Go to the Wordle website and click the “create” button
  3. Paste in your text
Here’s one I made earlier when I pasted in the text of a government report on higher education.
As with the Answer Garden tool, the larger the text, the more frequently the term has been used.


Using the tools in class

  1. Set your students some reading, along with a focus question. Set up an Answer Garden, and get them to post their (short) answer to the focus question. Use the opinion picture to talk about how they responded / reacted to the article.
  2. Divide your class into groups, either online or in class. Set them a discussion question. Get them to post their answers to an online forum or a shared Google document, or get them to take turns to type their answers into the computer in the room. Paste the resulting document into Wordle and generate the picture. Discuss the result.

ASKe's 1, 2, 3 strategy for understanding marking criteria

The ASKe group at Oxford Brookes University has been doing splendid work on assessment in recent years. Research publications by staff members – Margaret Price, Chris Rust, Jude Carroll and others – have contributed significantly to the body of knowledge underpinning teaching practice in higher education. The group works very hard to demonstrate how to apply the knowledge they have generated. So, for example, the group produces an ongoing series of 123 leaflets that highlight highly practical ways in which teaching staff can improve their students' learning. Each leaflet focuses on a piece of assessment-related research and clearly states how that research can be applied to teaching practice in three easy steps.

One of their strategies is outlined in a leaflet freely available from their website – Improve your students’ performance in 90 minutes. This strategy has emerged from research the group does into academic achievement standards.

The idea underpinning the strategy is that it’s not enough merely to tell students about standards (or to describe good student work). The teacher, according to the ASKe team, actually has to show students lots of examples, and to point out  – very explicitly – how good work differs from poor work, before students will begin to understand.  Putting it simply, if a teacher says to a student, “I gave you a Credit for this assignment because your argument wasn’t as strong as it needed to be and you didn’t support your argument with the right kinds of evidence”, the student probably doesn’t really understand what went wrong. The student is probably thinking that he did his best, and he did provide evidence, and he did argue the case.

So the ASKe team developed this strategy.

1. First, they say, work with first-year students before they hand in any summative work.
  • Provide students with two sample assignments – one good, one mediocre – on topics similar to (but not the same as) those to be examined in the course. Give them also the marking guidelines – rubrics, criteria, grade bands.
  • Ask students to mark the assignments, and to complete the marking sheets, using the rubrics and assessment criteria.
2. Second, a week after they have been given this task, run a 90-minute workshop.

At the workshop, get students working in groups to:
  • Compare the marks they each allocated and come up with a grade and rationale for that grade that the whole group agrees on.
  • Report their discussions to the whole class.
The tutor / lecturer / teacher then:
  • Compares the group rationales with the criteria.
  • Explains each criterion (using examples, and pointing out comparisons between the good assignment and the poor one).

3. Then, the groups re-visit their assessment, and re-mark the assignments now that they have a better idea of the meaning of the criteria before reporting to the whole class again.

4. The tutor / lecturer / teacher hands out copies of the assignments that he or she has marked and annotated.

5. And then, finally, three weeks later, when the students hand in their own first assignment, they also provide a complete marking sheet on which they have assessed their own work.

For more information on this technique and others developed by the Oxford Brookes ASKe team, visit their website.